Workbench · 7 min read · Updated 2026-09-08
Plan work in a table, then follow it with a board and calendar
Tables help organize work plans, track to-dos, and summarize materials.
Feature overview
Tables help organize work plans, track to-dos, and summarize materials. Put each item in a row with its status and dates, then view it in rows and columns, track progress by status, or see schedules by date.
This guide demonstrates a fictional “Weekly work plan,” with fictional tasks, people, and dates. Substitute your own daily to-dos; start with Task, Status, and Due date columns.
How to use it
First open the workbench
Open TabTin and go to the left-side Task page and click New task. In “Shortcuts” at the bottom right of New task, click Workbench to open the application entry list.
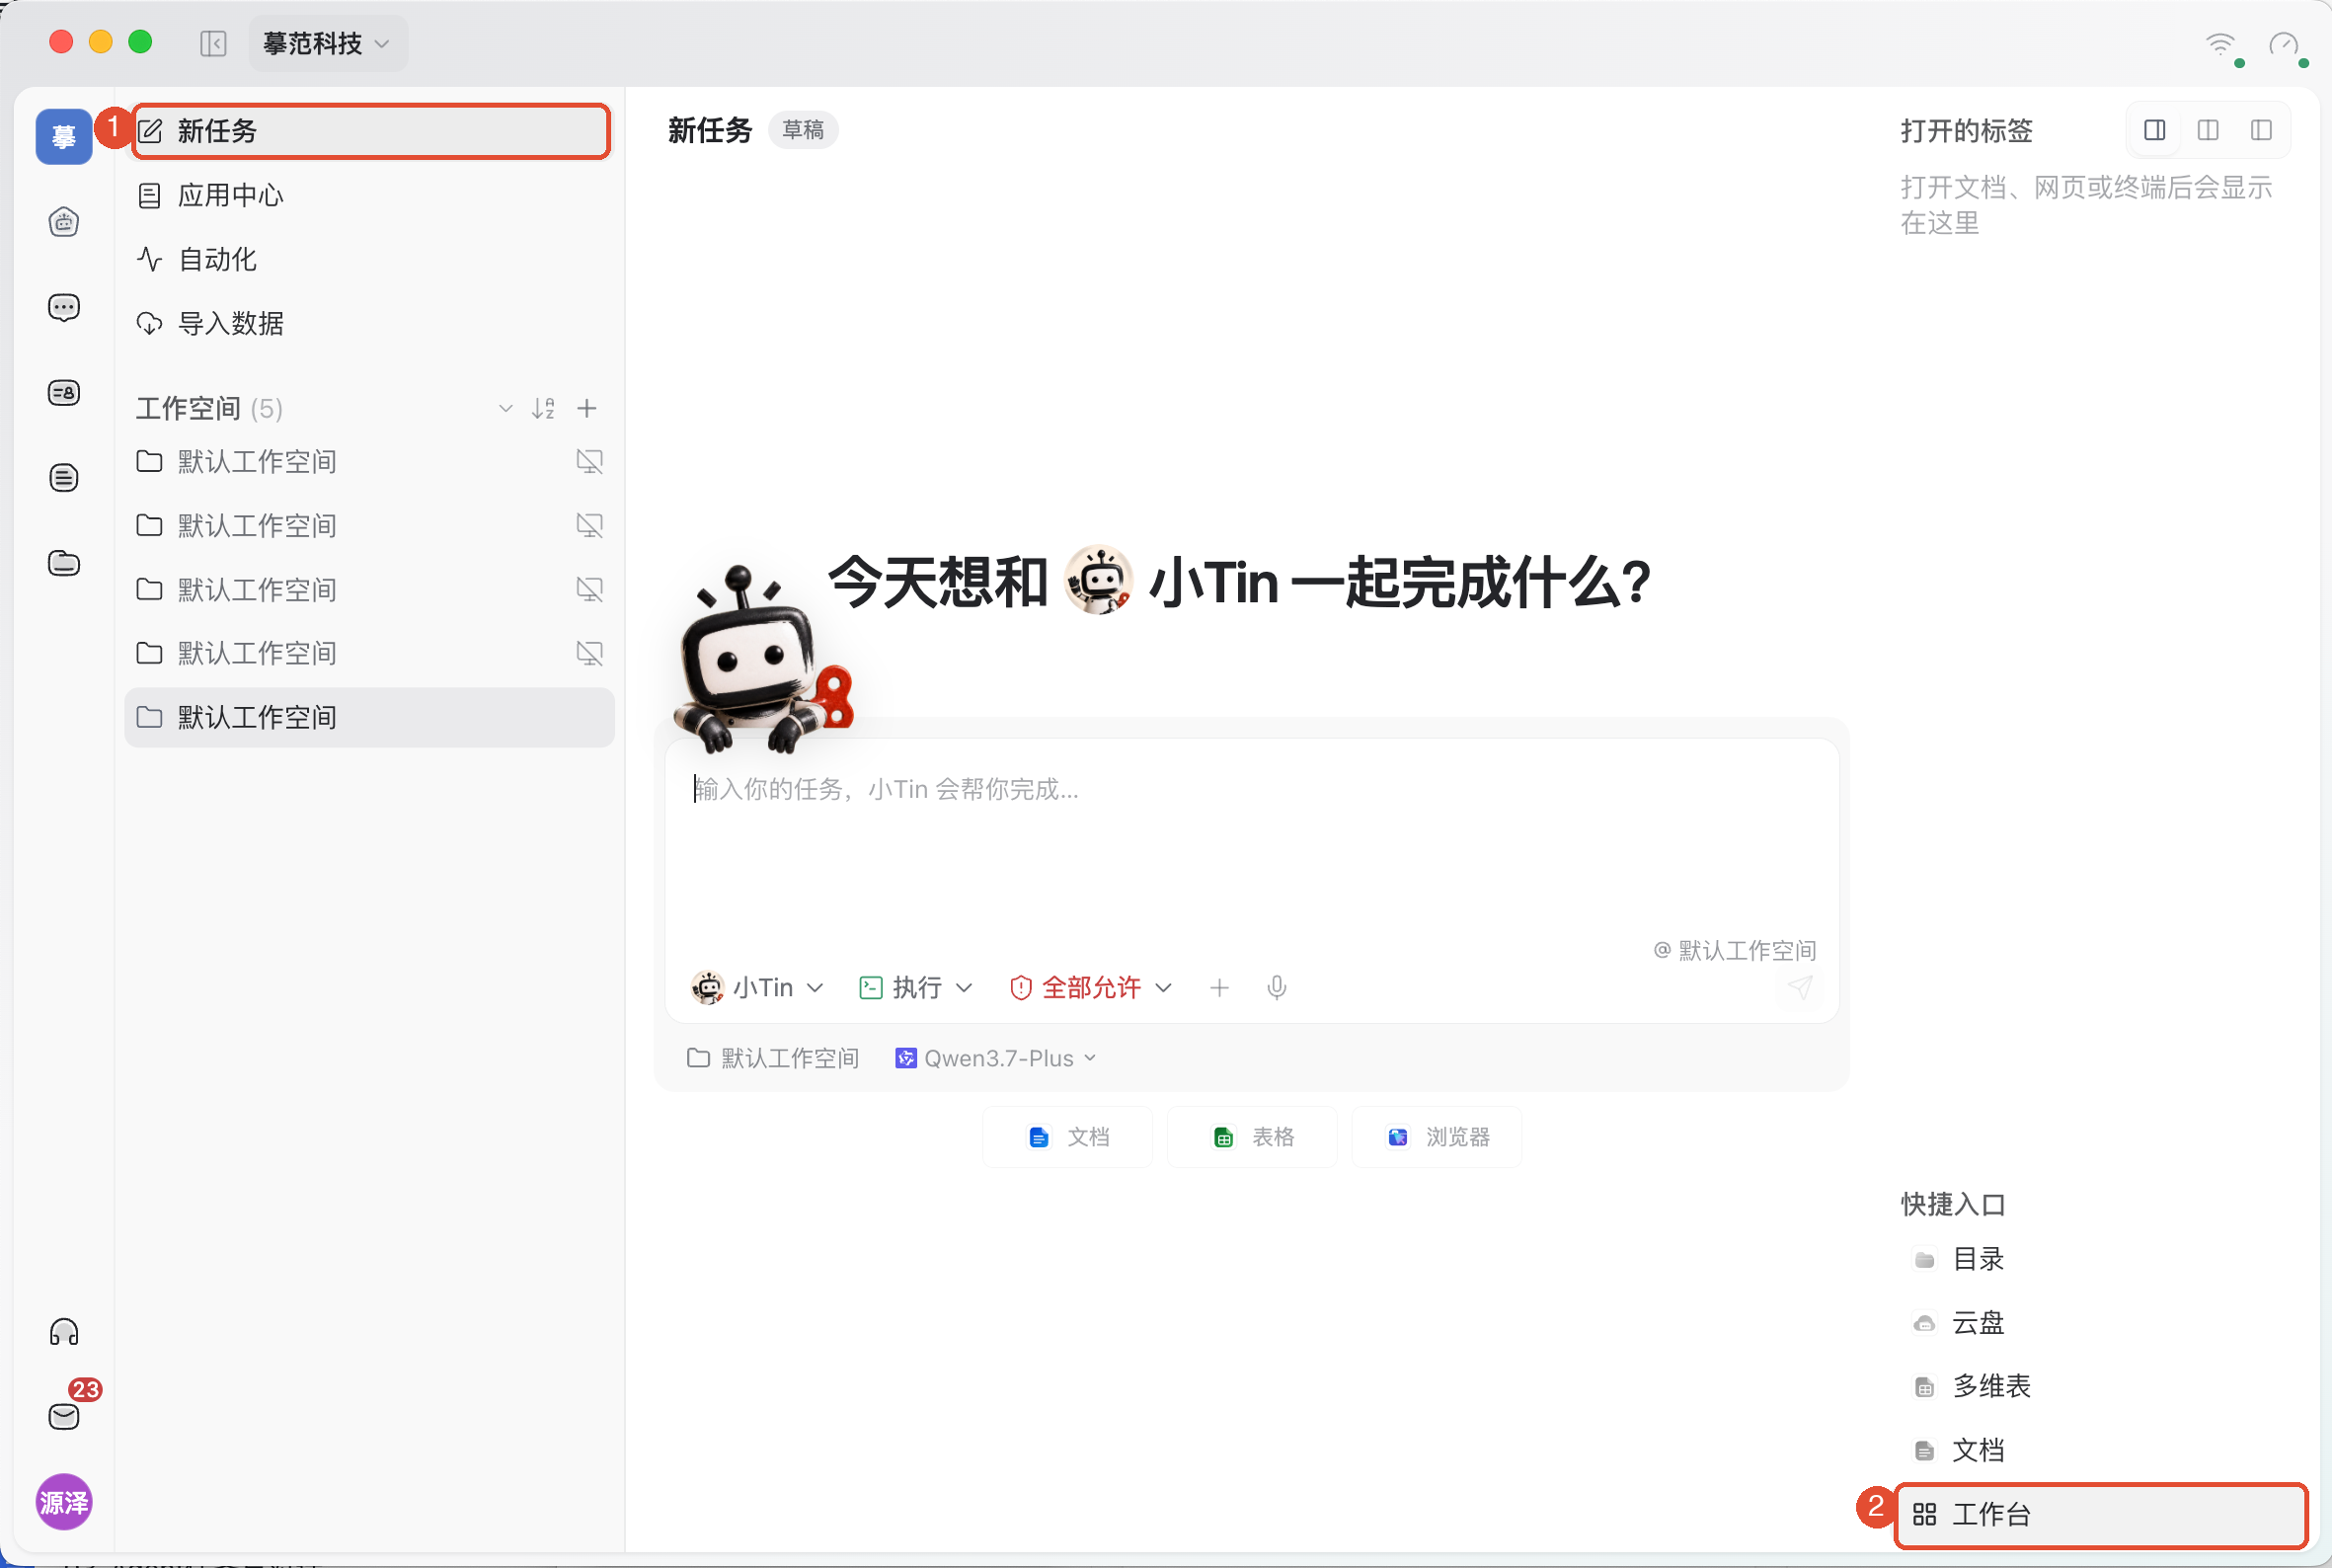
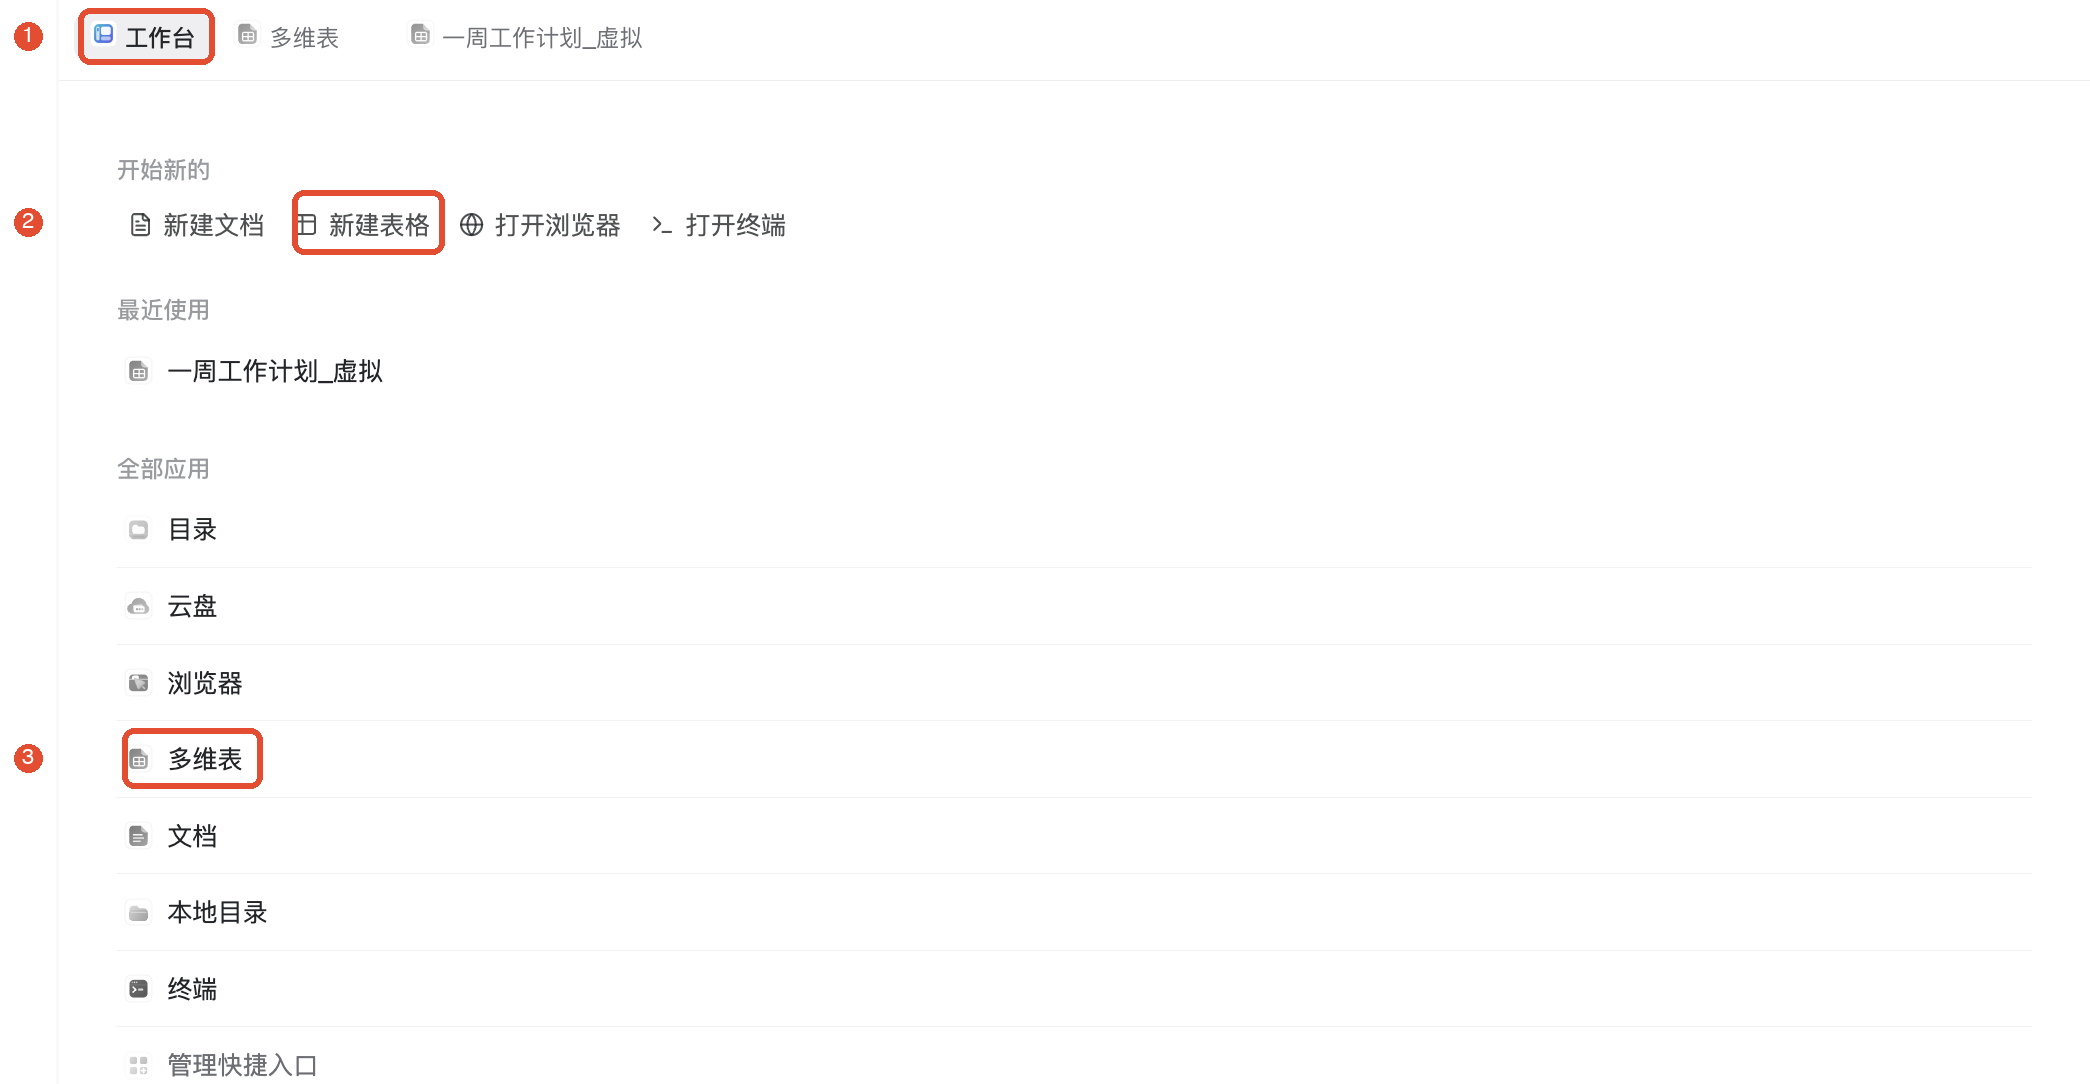
Once there, open the application using the steps below. If the top Workbench tab is already visible, click it to return to the application list.
1. Open or create a table
Open the task’s Workbench and click New table. To open existing content, click the workbench’s Multidimensional tables and select the table. It opens as a top tab you can click to return later.
“Multidimensional tables” is the entry point for table resources. Before entering data, click the table name and give it a recognizable title, such as “Weekly work plan.”
2. Set up columns and enter each work item
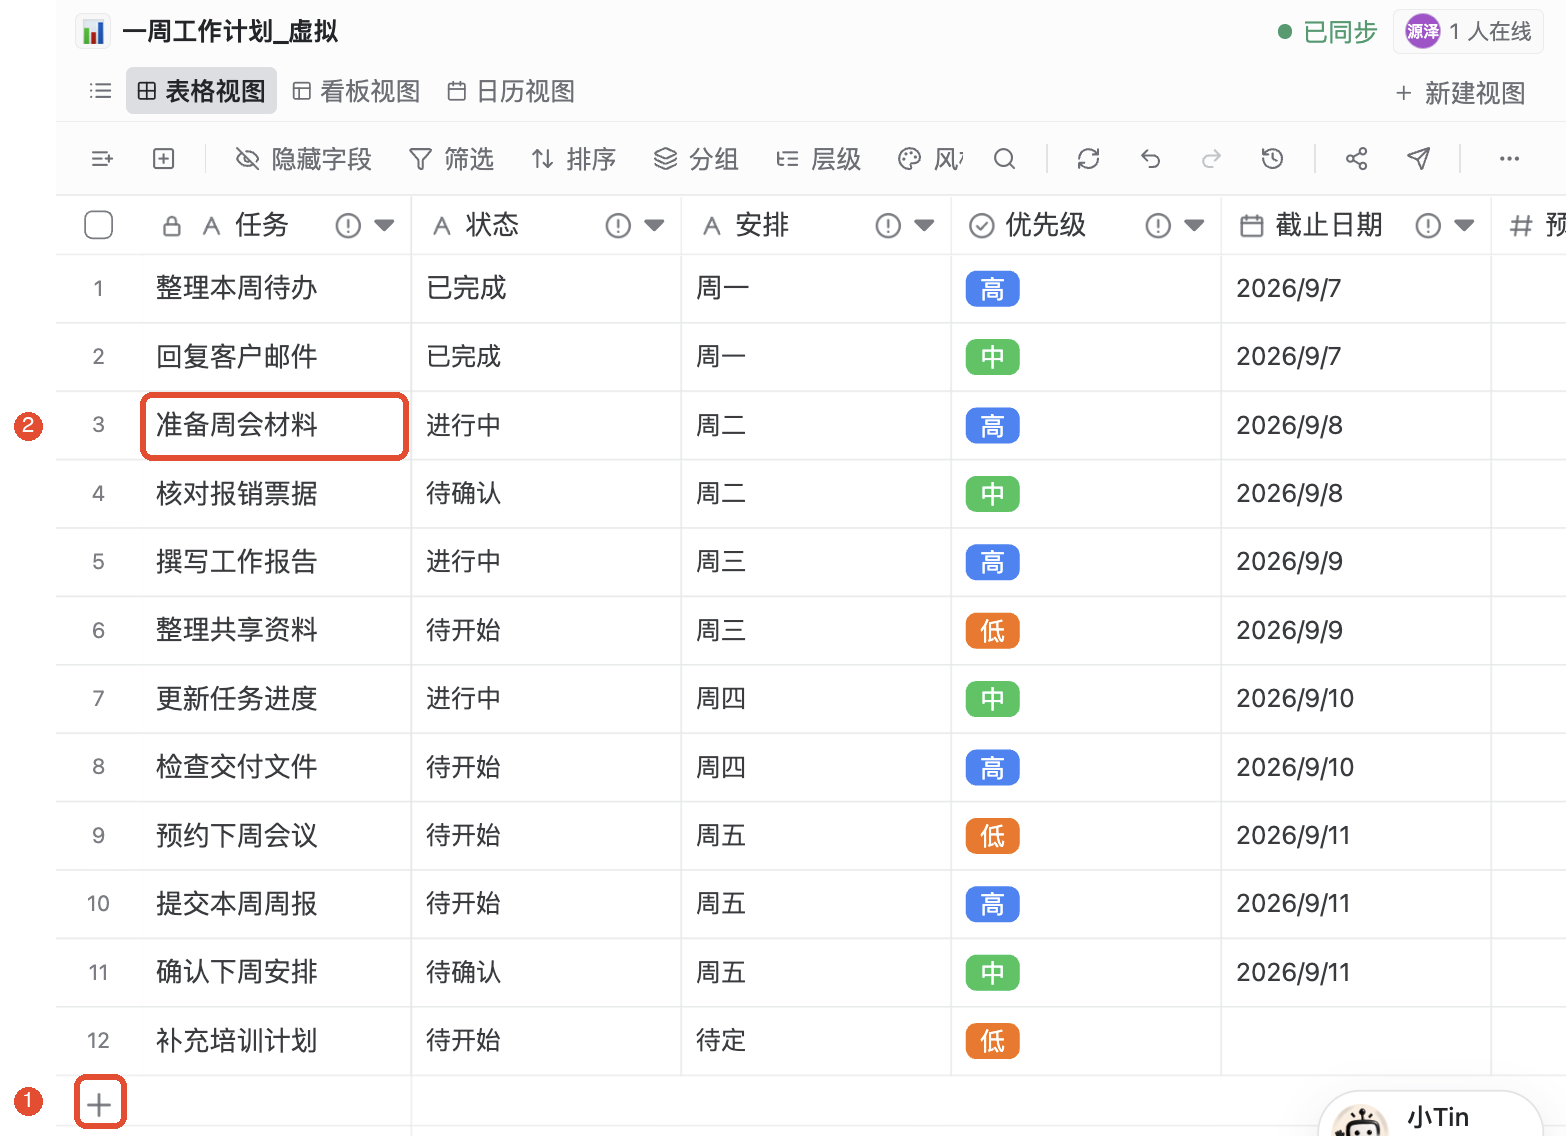
A field is a column of information; a record is a row of content.For example, enter “Prepare weekly meeting materials” under Task, “In progress” under Status, and the planned completion date under Due date.
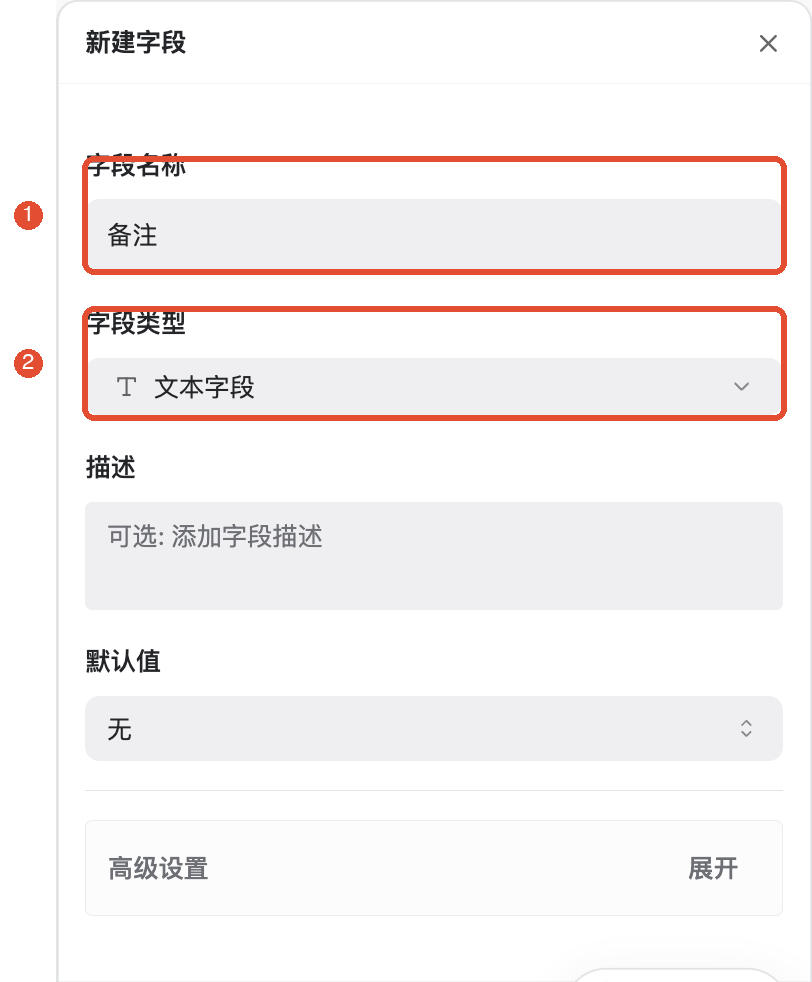
On the toolbar, click Add field, enter a column name (① below), and choose a type (②): text for task names, single-select for status, date for due dates, and number for estimated hours. Then click at the panel’s bottom: Create.
After setting up columns, click the toolbar’s Add record (① below) to add a row. Double-click a cell (②) to enter or edit content. Then check that the top-right sync status says Synced.
To modify a column, right-click its header and choose Edit field. For example, if hours appear as stars, change the type to Number, then check conversion prompts and existing values. To temporarily remove a column from view, use Hide field. Deleting a field also affects that column’s data.
3. Track progress with a board
Create a board to quickly distinguish completed and ongoing work.
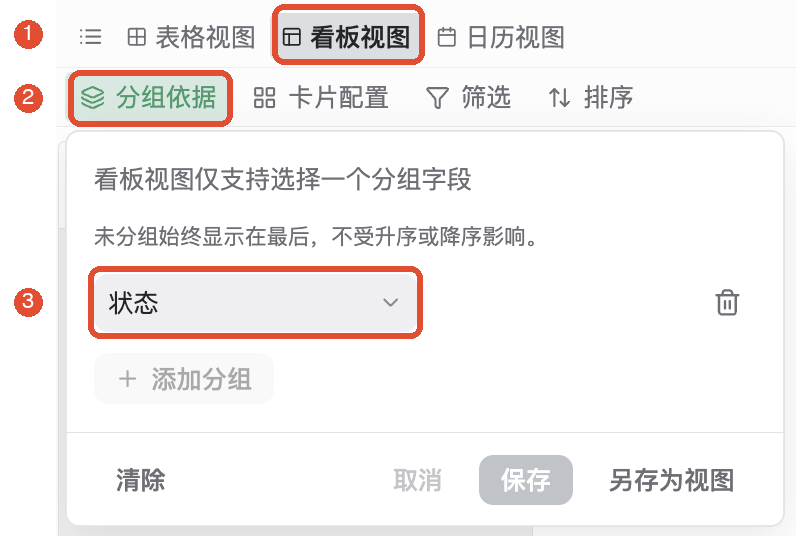
- At the top right, click New view → Board, choose grouping by Status, and confirm.
- Click the newly added Board view tab (①). Each work item becomes a card in its corresponding status column.
- To change the grouping, click Group by (②) and choose another suitable field.
4. View due dates in a calendar
- First fill in Due date for your tasks.
- Click New view → Calendar, choose Due date as the date field, and confirm.
- Click Calendar view (①), and in Calendar settings (②), check the date field. Dated work appears in the corresponding day cell (③).
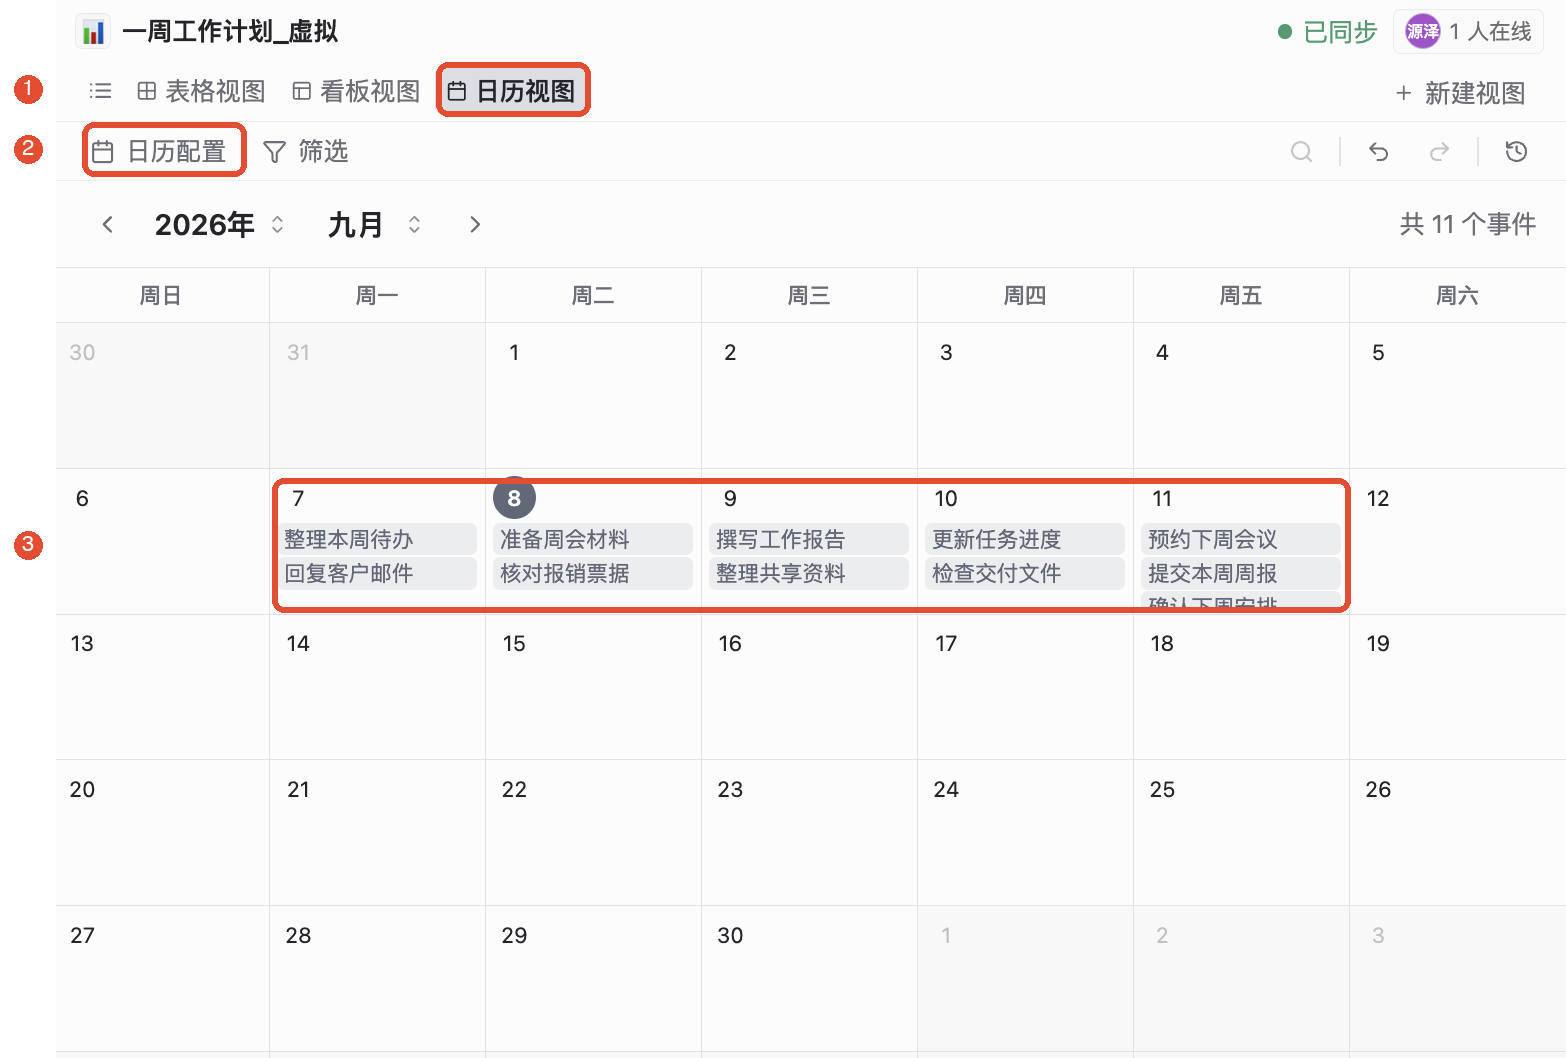
Views are different ways of looking at the same data.Boards and calendars do not each copy your work plan. Editing a record in any view changes what the other views show too.
5. Filter the work you need now
For example, to see only In progress work:
- Return to Table view and click the toolbar’s Filter (①).
- Add a condition, choose Status, set it to Contains, and enter In progress (②). The list then shows only matching work.
- Click Save (③) to keep the filter in the current view. To preserve a separate way of viewing, click Save as view. For temporary viewing only, click Cancel.
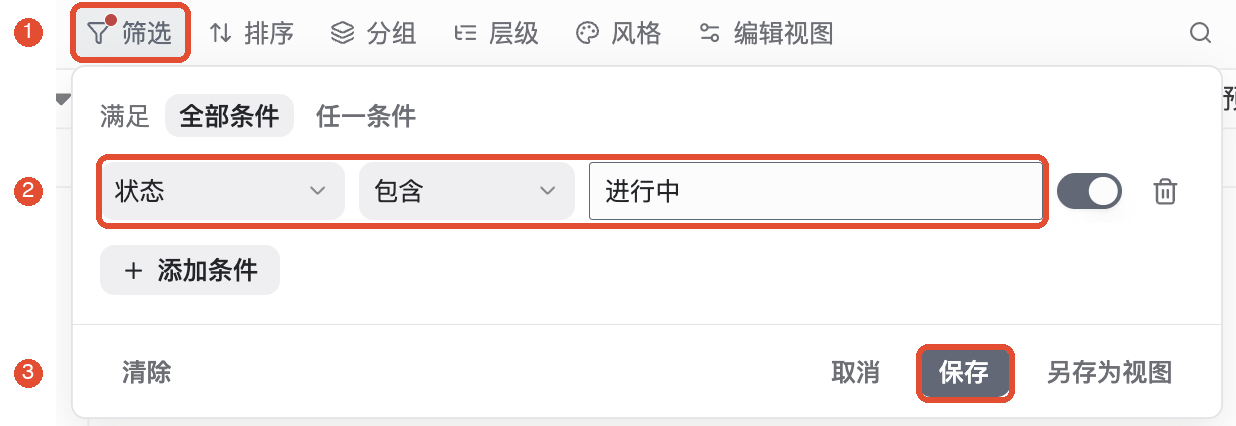
With multiple conditions, All conditions requires every one to match; Any condition requires at least one. To see all work again, open filters, clear the conditions, and save.
Other common features
Find, sort, and adjust the display
- Find content: Click the toolbar magnifier and enter a task keyword, such as “weekly meeting.” Move between matches with Previous and Next; close search when finished.
- Sort: Click Sort and choose a field such as Due date and an order to put earlier deadlines first.
- Group: Click Group to place work with the same status or owner together.
- Gallery: Choose Gallery under New view to browse images or summaries as cards.
Copy, comment, and use AI
Right-click a record for actions including Insert row, Duplicate and add record, Add subrecord, Comment, and View record history. Duplication creates a new record, useful for similar to-dos.
For an AI summary, choose from the record menu: Send to AI conversation, then state your request, such as “Organize this week’s to-dos by status and due date from these items; mark missing dates as pending.” To edit the table, specify its name, target records, and fields, then return to verify the result.
Import existing data and export for others
Import: On the right of the toolbar, open More → Import data and choose a CSV, Excel, or JSON file, or download the import template first. Check column-to-field mapping, data types, and import mode before confirming the write. Verify dates, numbers, and statuses afterward.
Export: Open More → Export data, choose format, scope, and fields, then click Export file. CSV suits data exchange, Excel suits continued editing, and PDF suits reading or printing.
To export the entire table, choose All records. Current view applies filters and sorting; Selected records exports only your selection. Open the exported file and check completeness.
Sharing, history, and linked records
Sharing: Click the sharing icon on the toolbar’s right to view collaborators and access settings. With management permission, add members and set access. Sending a link alone does not grant access. Check the sharing panel for public-link scope.
View history: Click the toolbar’s history icon and select a timeline version to view its snapshot. Before restoring, check the time and affected scope, then choose Restore this version. Viewing a snapshot alone does not restore data.
Link other tables: When adding a field, choose Link and a target table so records can reference its information. Viewing linked content still requires access to the target table.
Things to keep in mind
- Viewing permission is required to open a table; editing permission is required to add or change content.
- When people share a view, saved filters and sorting may affect others’ viewing. Save a separate view for temporary personal needs.
- Before deleting records or fields or restoring a historical version, confirm the target and scope. Deleting is not hiding.
- Exports deliver data; they are not complete backups of view settings and history.
FAQ
Why have some work items disappeared?
Check the current view and filters. In a calendar, also check whether tasks have dates and whether the displayed month is correct.
Why can I view but not edit?
Check your table permissions. Ask its owner or administrator to adjust them if you need editing access.
Why does the export contain less than the table?
Check whether you chose Current view or Selected records, or only some fields. Use All records for complete data.